Good morning!

Over the past month or so, we’ve been very very fortunate to find two wheels from Scandinavia. Both Kijiji finds, both very reasonably priced, both with all their parts and both in spinning order! One was in a ready-to-spin-right-now-and-i-cant-wait-to-get-started state, the other more of a help-me-im-smothering-underneath-all-this-nasty-oil-paint state lol but you’ll get to see how I saved her…she was sort of masquerading as one of those captains beds from the 70’s – you know the ones! – and had not been used much in her life but is definitely made to work. I took her for a test spin before beginning the stripping, just to reassure myself.
Ok, so, the first spinning wheel we found….

She was found in Trenton, Ontario and has a little bit of history (as told by the guy we bought her from). She was apparently brought from Sweden, by her Swedish family, and has been in the same family for her lifetime, save the time she spent with the gentleman we bought her from. The interesting thing is that she is actually a Norwegian style double table wheel with distinctive Finnish double upright wheel posts. The beautiful curving end caps on these double posts are also distinctly Finnish.

Check out her bearings! This wheel is absolutely THE MOST SOLID wheel in my collection – old or new. She is put together completely with wooden pegs and everything is in perfect shape. She’s like a miracle wheel, considering her probable age…


An amazing thing…she has all her bobbins! And the wood is beautiful….

After cleaning…

the third bobbin, on the flyer…

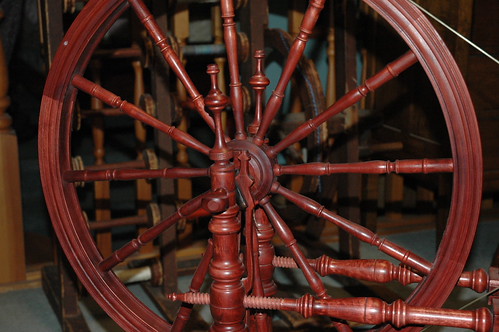
Her treadle has the comfy foot indent and she loves to spin…a cleaning, an oiling and away we went 🙂 Her wheel is large, partially hand carved and beautiful. It measures 26.5 inches, approximately.
God bless her original family, they took exceptional care of her.
Now, the second wheel…

We found this wheel on the local Kijiji, just about 30 minutes away. I couldn’t help but notice the double wheel posts with the curving cap which are secondary supports on this tiny spinning wheel and I was intrigued since I had just gotten the first a week or two before.
She was covered in thick brown oil type paint – very shiny. I could tell that it was not original paint because they had painted over her decorative end caps. She was doing a very good job of impersonating a reproduction wheel of some sort from the 70’s and I had more than one doubt when buying her.
My grandson, bless him, loves her. Grandma, for ME?!!! was his reaction 🙂

First things first, when I got her home I took her for a spin and she did spin!
Some pictures of her parts…

The painted over decorative caps

The flyer and mother of all

Yes, she has bearings

This was a job for solvent…and lots of gloves and paint scrubbie pads…


The wheel itself was a lot of work…


And then all the smaller pieces…
The pressure fit whorl

The flyer

The bobbin

The whole job took approximately 20 hours, lots of patience and plenty of elbow grease but now she is perfect!
Her flyer, with tool marks from the file it was ‘sanded’ with

The arched post cap

Tension

Side view/alignment


From the back

One thing missing – one decorative metal ‘cap’

It’s a super cute antique spinning wheel that has seen very little use. There is no foot indentation in the treadle, the hooks may be replacements but they are in good shape and well bent so I didn’t replace them. She has an odd arrangement with the front maiden on an angle to accomodate the flyer and a 14″ wheel diameter.
After stripping the whole thing, I treated the wood with orange oil, no wax so far.
Have a fantastic day! 🙂
 Wow, cannot believe how long it’s been!